
4/29/23 edit: At some point, this stopped working well for me, and I switched over to just using the GitHub desktop app, and that’s been working fine.
As I work with more trainees as they join the lab, it could be helpful to have a single RStudio GitHub repo that we share so we can work on the same project / analysis script. Here are a series of steps we can do to set this up.
Someone first has to initiate the repo. Log into your account on GitHub (make an account if you don’t already have one). Make a new Repo. If you’ve been added to the lab, then make a new repo within the lab. Add some kind of description, click “Add a README file”, and then hit “Create Repository”.

Here’s the blank repo that should now exist:

Now go into RStudio (which you should have already installed), and go to File -> New Project.

Click on Version Control:

And then click “Git”:

Next you’ll need to enter in some info. Add in the web address fo the repo you just made and want to link with your RStudio, make sure you’re happy with the project name, and then enter in where on your computer you want the project to be located.

Cool, now you have a very blank looking project.
Now let’s start adding things to the project. For example, let’s make an R Markdown file where you will start making the analysis script. To do this, go to File -> New File -> R Markdown…

A new screen will pop up. Add whatever details you want, and hit “OK”.

The file isn’t saved, so save it in the same directory as your Rproj and Readme file, giving it whatever name you want to give it (probably the same name as the repo).

If you use the default settings, you’ll get a generically prepopulated RMarkdown file. Get rid of everything but the first chunk, since you’ll just reuse the first chunk. Add in some generally useful initial code as I have in the picture below:
So you’ve already made some changes to the repository than when you first created it, since you 1) Made an R Proj file and 2) Made a R Markdown file. We can now send these changes back to the repo. Go to the Git tab on the top right panel…

Click on the two things you want to update (in this case, the Rproj and Rmd files), and hit Commit.

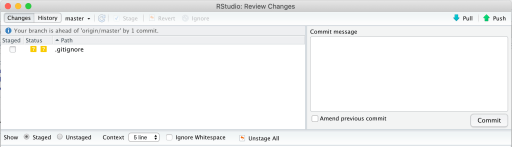
The next screen should be the commit screen. If you click on the items, it should tell you what’s different from the previous version. New things should be green (since these files are new, the whole thing is green). Write a message to generally describe what’s different with this new set of committed files, and then hit “Commit”.

You’ll get an output screen, like this:

This essentially means you approve of the changes you made, and you’re now ready to send it back to the repo (cloud). The commit screen is now different, and this time hit “Push”.
You should now get a different commit output screen, which says something like this, which means you sent it back to the master branch on the repo:

You can check to see if the repo was indeed changed by going back into your web-browser where you had logged into GitHub and had made the new repo. If you look, you’ll see that the new files are there.

Great. So the idea now is that you can now make changes to the contents of this repo, and send it back into the Cloud so everyone can now see your updated versions. For best performance, you’ll want to hit “pull” before you start working on something (to make sure you have the most up-to-date version of the repo), and once you’ve done your work, hit “push”, so other people can see and work with what you’ve done.
If you’re not the person who first initialized this repo, then you’ll have to follow a similar but slightly different series of steps (You won’t need to make the repo yourself). This resource was super helpful in helping me figure out how to do this, and will likely be quite helpful for you too!
8/26/2021 Update: So Github doesn’t allow you to do this with a password anymore, and you need something like a personal access token. Thus, follow the instructions listed here on how to create such a token. I then use gitcreds to actually handle the token, as described here.